Enables to install EV charger on buildings with limited power capacity available
Makes it possible that existing grid fuse size is sufficient for the entire house' needs and thus house owner may avoid higher grid connection fees
Provides more powerfull EV charging when there's free capacity available, like night times and reduces charging power when general energy usage is on higher level
Override:
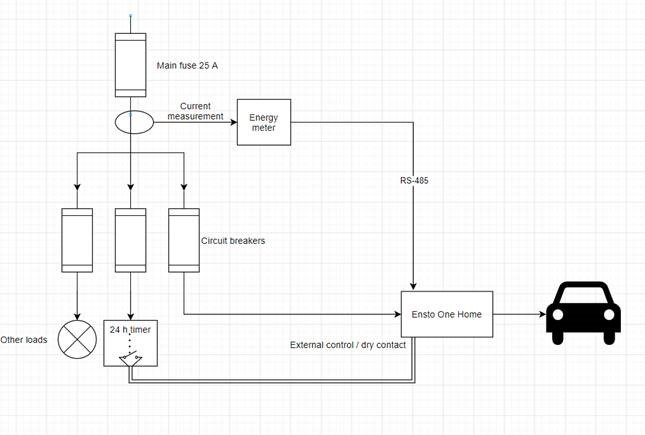
Ensto One Home has NO/NC input for connecting some external control device
Charging event can be controlled (ON/OFF) based on the external NC/NO input to protect main fuse
External control device may be relay, timer, switch etc. that can enable NO/NC information to charger
This functionality supports also Netatmo load shedder (home control/automation)
What is needed:
Ensto One Home (HW with new load management features)
External control device/signal (NO/NC, not included on Ensto delivery)
Signal cabling between external control device and Ensto One Home
Dynamic load management:
Enables adjusting (increasing, decreasing) max. EV charging current based on local measurement output (energy meter) on the supply (distribution board) side
What is needed:
Ensto One Home (HW with new load management features)
External energy meter (supported model, installed on distribution board, not included on default charger delivery/sold separately when needed)
Modbus (RS485) communication cabling between energy meter and Ensto One Home
How to enable these functions:
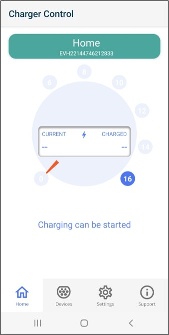
Ensto One Home's Charger control app will have dedicated settings for the new load management features
"Note! Only professional installer shall configure and adjust the max. load management settings"
Step-by-step:
1. Open Mobile app

2. Connect to charger
3. Open settings menu
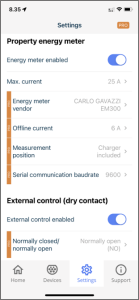
4. Configure settings according to installation.
"Note! when defining maximum charging current, characteristics of the incoming MCB/fuse must be taken into consideration"
Energy Meter details
Supported energy meter:
EVHEM217 (Carlo Gavazzi EM2172RVV23XOSX)
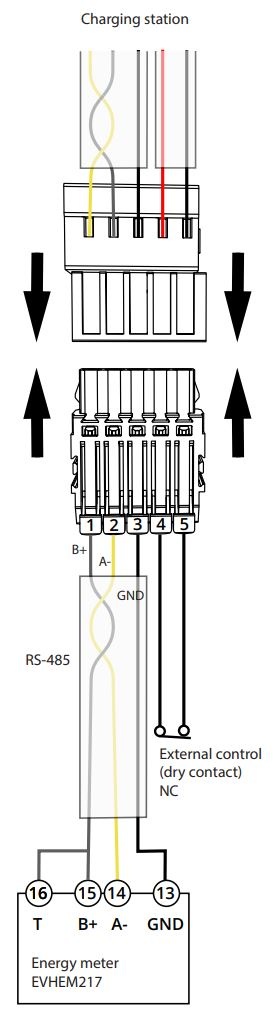
• Connect the energy meter to terminals 1 [B+], 2 [A-] and 3 [GND].
• Use a twisted pair instrumentation cable RS-485 when you connect the energy meter to the charging station.
• Recommended cable type: NESMAK-HF 2x2x0,5+0,5 or similar.
• The system has been tested with 100 m cable length.
• Make sure that the RS-485 baud rate is equal in the charging station and the energy meter.
• Do not change EVHEM217 Modbus default parameters.
Modbus: client ID 1
Databits: 8
Parity: none
Stopbits: 1
• Make sure that the signal wires are connected correctly to the energy meter.
• Terminate the transmission line in accordance with the wiring example.
Dry Contact Details
• Connect a dry contact module for override mode to the terminals 4 and 5. Remove the jumper from the pre-installed
connector.
Note! If you do not connect a dry contact module to the
charging station, do not remove the jumper or change the
related settings in the Charger Control application.
• The default setting for external control is NC (normally closed).
When the contact is closed, charging is allowed.
When the contact is opened, charging is not allowed.
• If you install the external control as NO (normally open),
change the settings accordingly in the Charger Control application.
